If you’ve ever tried embedding a Google map on a website or in an app, you’ve probably seen a message saying that a special key is required. This key grants access to the services and allows you to display maps on project pages, build routes, or find addresses. Without it, the maps simply won’t work. In this article, we’ll go through a step-by-step guide on how to get an API key for Google Maps, why it’s needed, and what points you should consider.

What is a Google Maps API key and why do you need it
An API key is essentially a password you receive from Google so that your website or application can use the interactive map. With it, the system understands: “Okay, this is the right project, it can display maps, calculate routes, or search for addresses.”
To make it clearer, imagine you’ve installed an intercom on your door. A guest enters a code, and the door opens. The API key works the same way: without it, access to Google Maps services will remain closed.
Why it’s needed:
- Tracks who and how many times the service is being accessed;
- Helps control expenses so the bill doesn’t come as a surprise;
- Protects your project from third-party use of the key.
So even if the map seems to work on a test page without a key, in a real project it’s mandatory. If you’re planning to create a website, don’t forget about the API key – a map with an address always adds trust to a business.
Step-by-step guide to getting a Google Maps API key
To avoid confusion in the settings, the QuatroIT web studio team has put together a simple guide with steps and screenshots. By following it, you’ll be able to create your own key and connect maps to your website or app without unnecessary difficulties.
Step 1. Log in to your Google account
First, you’ll need a Google account. If you don’t have one yet, you can create it – it takes only a few minutes and is completely free. Most users already have an account (for Gmail or YouTube, for example), so just log in and move on.
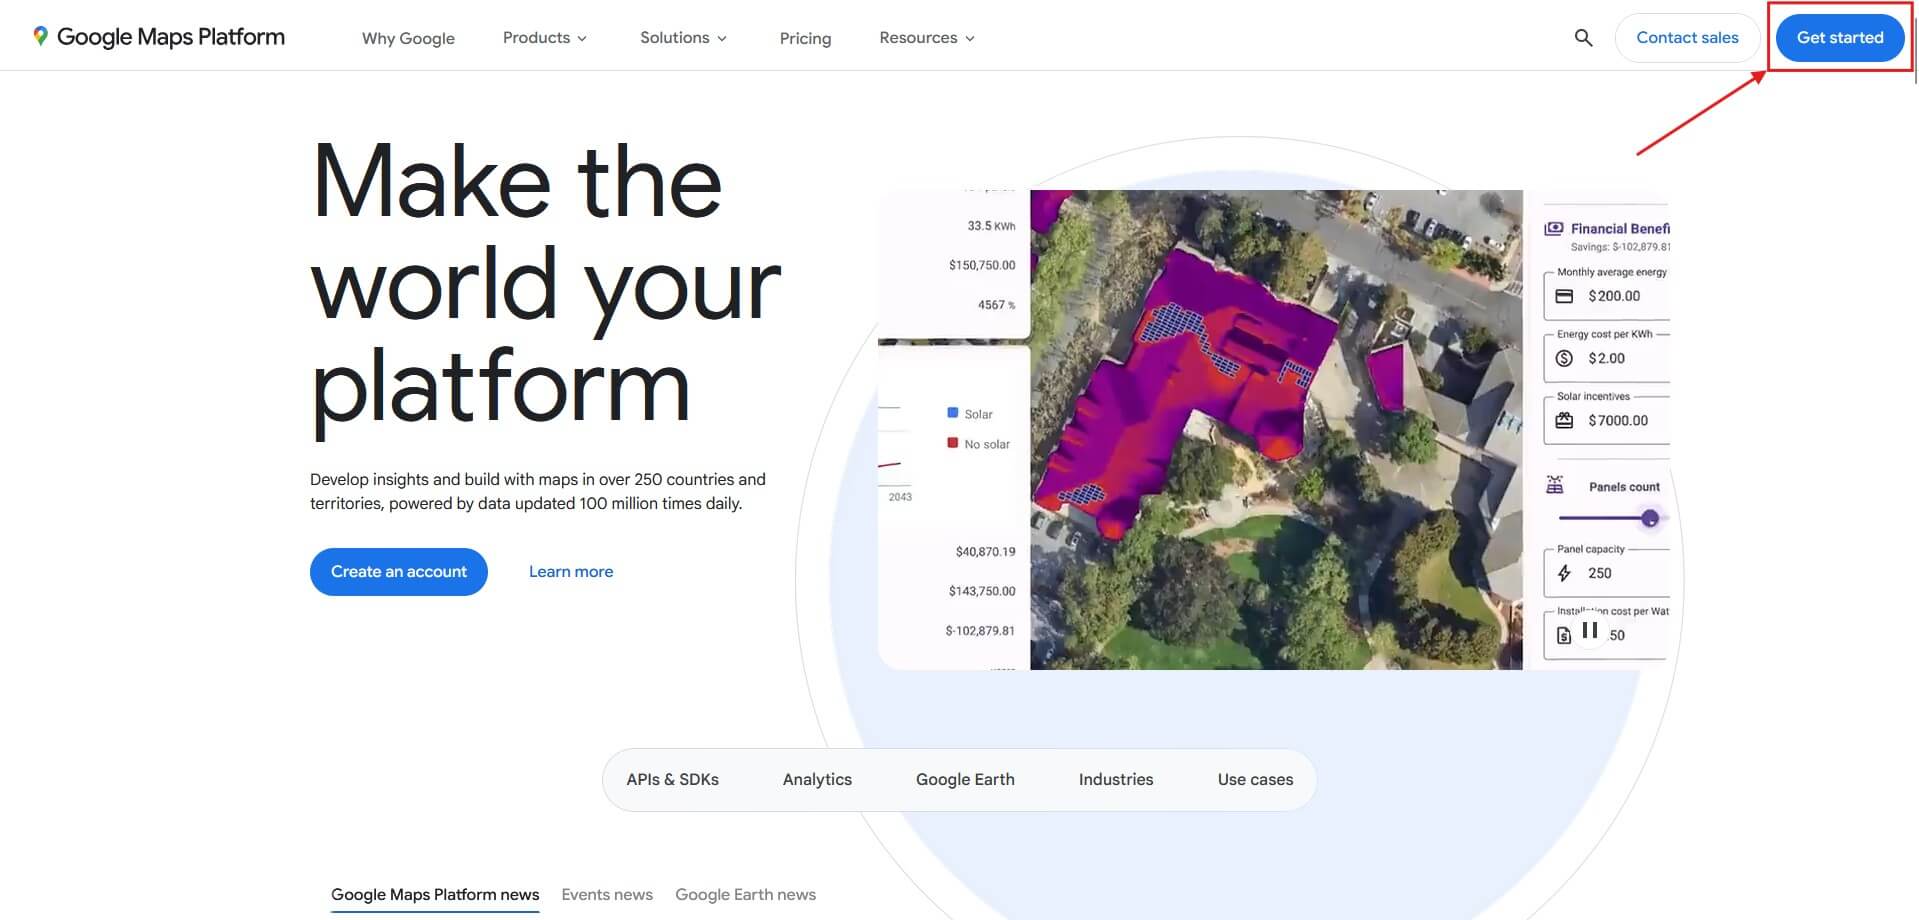
Step 2. Go to Google Maps Platform
Next, open the Google Maps Platform website and click the Get Started button. After that, the system will automatically redirect you to Google Cloud Console, where all work with keys and settings is done.
Note: In some cases, before moving to the console, an additional window with the Finish account setup button may appear. Just click it and proceed.

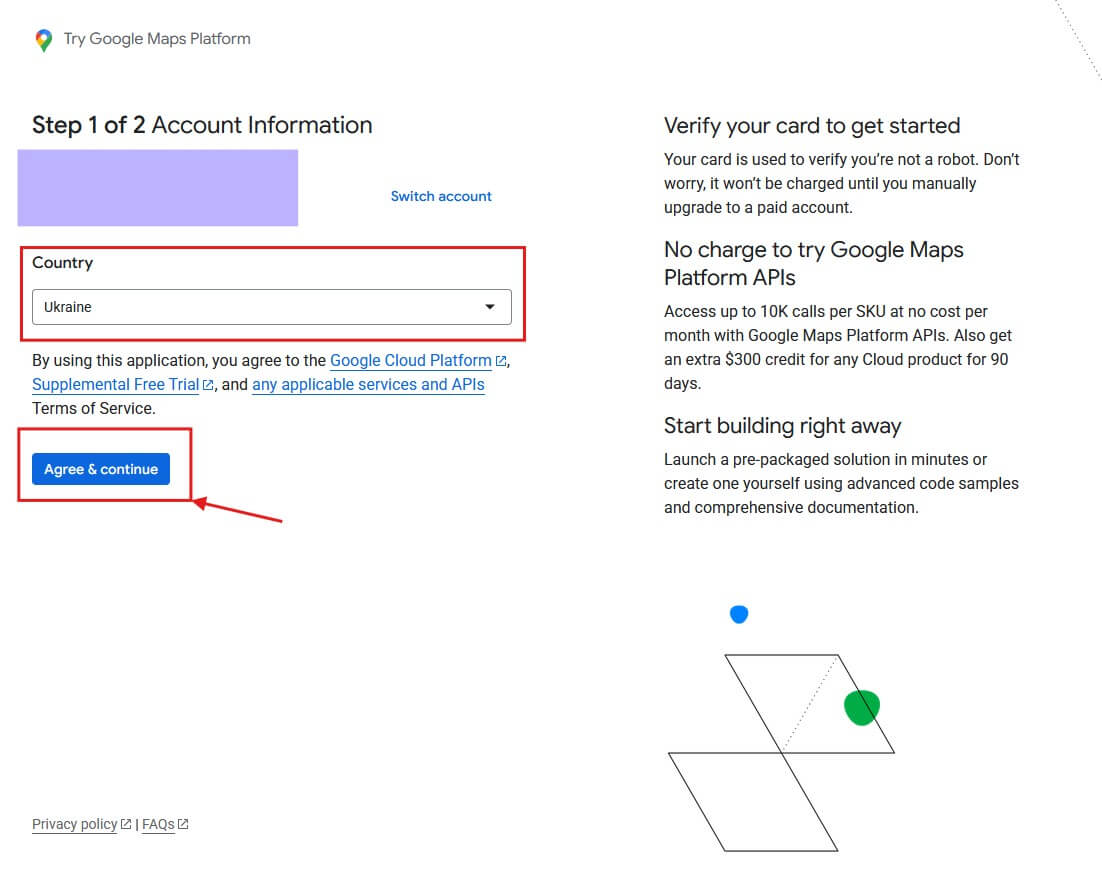
Step 3. Fill in account details and confirm your payment card
Select your country (for example, Ukraine) and agree to the service’s terms of use. After that, click Agree & continue to proceed.
Next, the system will ask you to add a bank card. This is required to verify the account and activate Google Maps Platform. Don’t worry, no automatic charges will be made. The service usually blocks a small amount (e.g., $1) for verification, but it is immediately returned to your balance. You can use Visa or Mastercard when adding a card. However, Google sometimes declines Visa, so in practice it’s better to use Mastercard – this way the process is faster and more reliable.
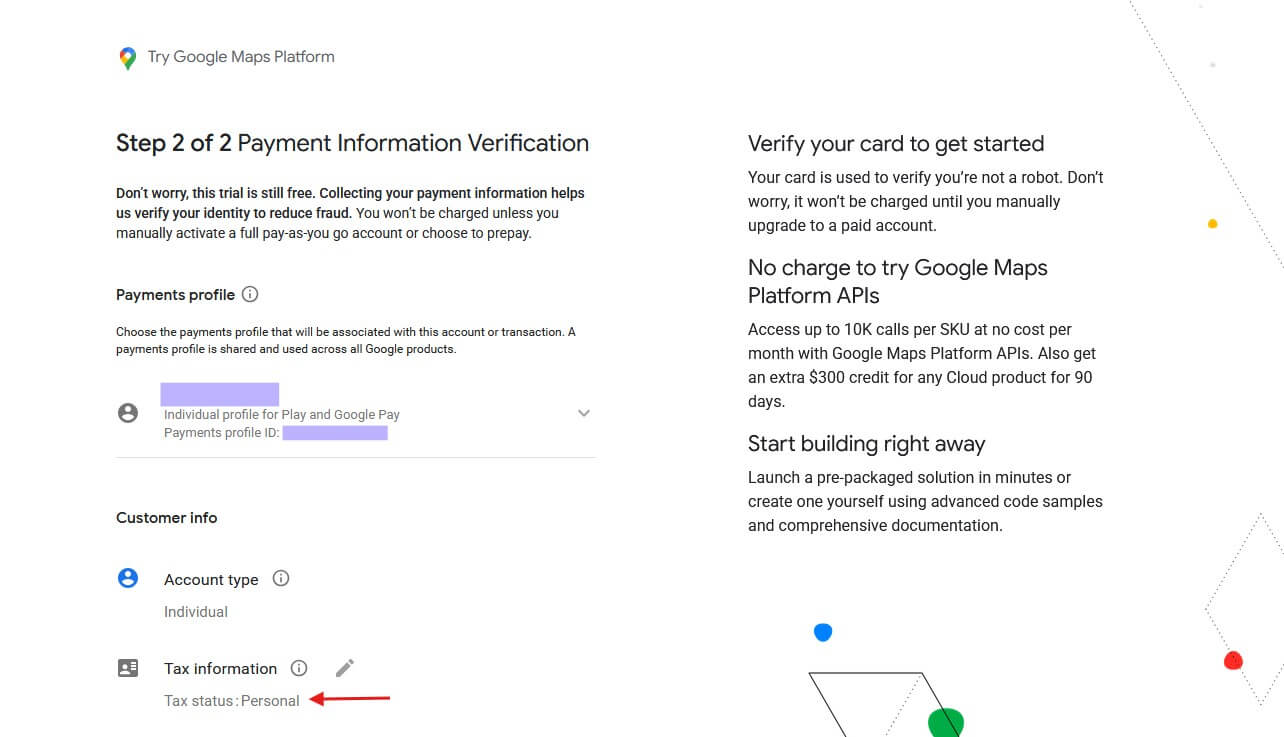
During payment verification, the system will ask you to fill out a billing profile. Nothing complicated:
- Leave Account type as Individual.
- Choose Personal for Tax status.
These are standard settings for most users. If you’re connecting the service as a company, you can select business parameters and fill in your organization’s details, but for regular sites and apps, the Personal option is sufficient.
After entering your data (name, address, city, and postal code) and adding the card, click Start free. This completes the creation of the billing profile and activates access to Google Maps Platform.

Step 4. Get your API key
After activating your account, Google provides a bonus – $300 in credit and 90 days of free use of the services. This is enough to test the integration and determine which APIs you actually need. Once the free credit is used up, the system will prompt you to upgrade your account to unlock full access to all Google Cloud services. Importantly, for most standard Google Maps usage scenarios, automatically renewable monthly free limits apply. Therefore, in many cases, no additional charges may arise after the trial period ends.
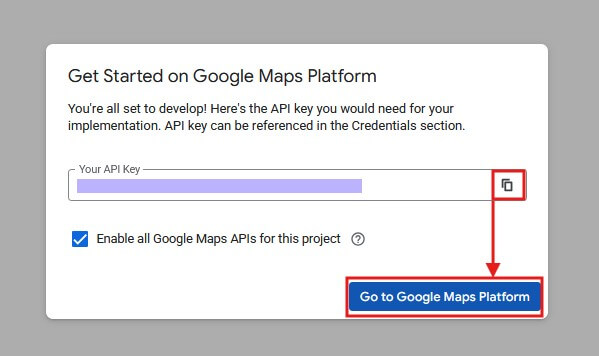
At this stage, a window with your generated Google Maps API key will appear. Copy it and store it in a safe place. It’s required to connect the map to your website or app.
Pay attention to the checkbox “Enable all Google Maps APIs for this project.” If you only plan to use certain services (like maps and geocoding), it’s better to uncheck it and activate only the APIs you need manually. But at this stage, you can leave everything as is.
After clicking Go to Google Maps Platform, you’ll enter the console where you can manage keys and all project settings.
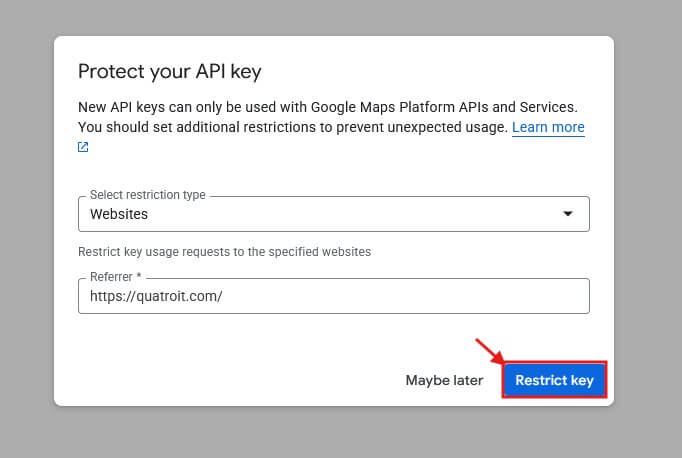
Step 5. Secure your API key
As soon as you receive your key, the system will prompt you to protect it from unauthorized use. This is an important step because without restrictions, anyone who finds your key can use it, and the costs will be charged to your account.
In the “Protect your API key” window, in the Select restriction type field, choose a restriction method:
- Websites (HTTP referrers) – the key will only work on your domains;
- IP addresses – access is only possible from specific servers;
- Android/iOS apps – the key can only be used in the specified app.
If you’re integrating the map into a website, simply select Websites and enter your domain (e.g., https://quatroit.com/). This ensures the key won’t work on other resources.
After entering the data, click Restrict key to apply the settings.
How to protect your API key:
- Use domain or IP restrictions. This prevents other sites or servers from using your key.
- Don’t leave the key exposed in source code without protection (e.g., in public repositories).
- If you’re testing a project, create temporary keys and delete them after finishing.
- Regularly check the key’s usage in Google Console to spot suspicious activity in time.
- Update keys when necessary (create new ones and disable old ones) to minimize leakage risks.
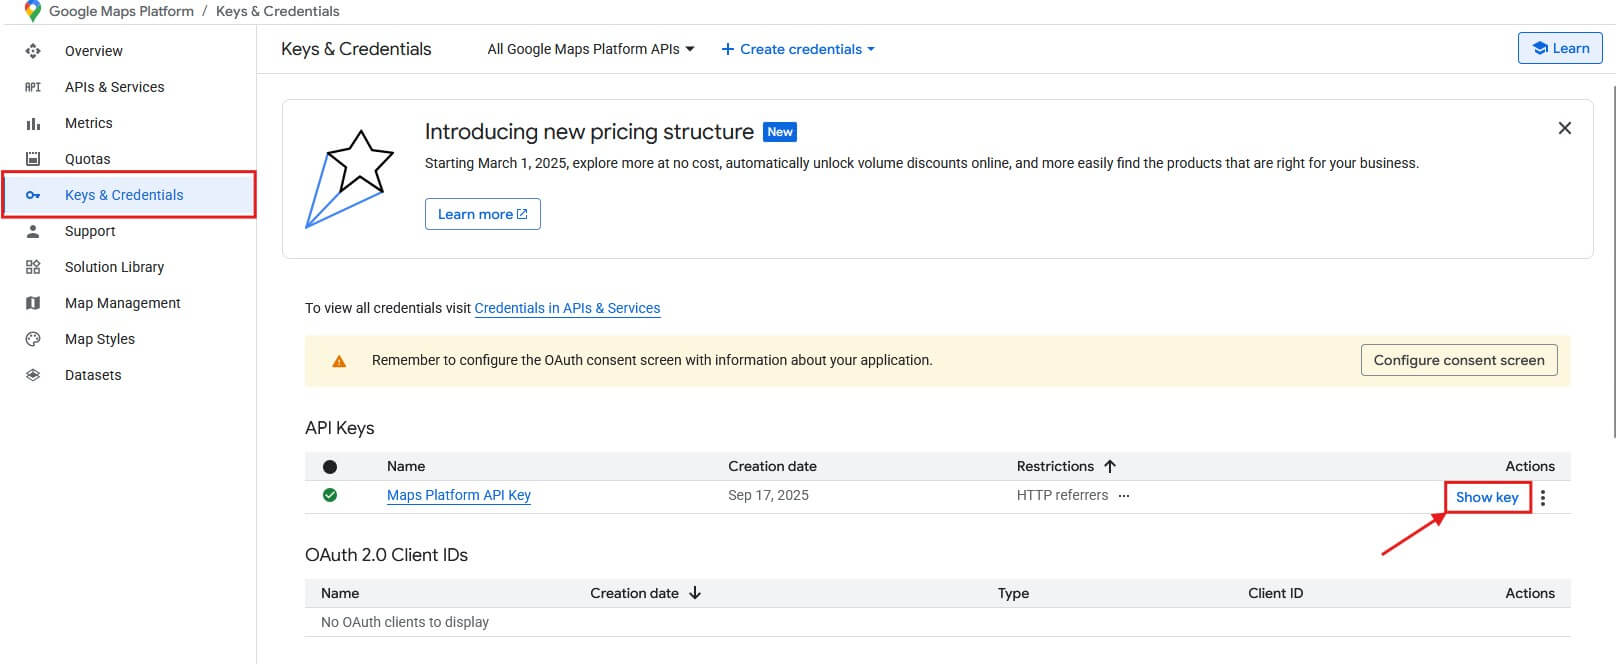
Step 6. View and manage your API key
Once setup is complete, you’ll land in the Keys & Credentials section. This is where all created keys, their parameters, and available actions are displayed. If needed, you can click Show key to copy the key, change restrictions, or delete it.
Congratulations! You now have a working Google Maps API key. Next, you need to pass it to your developer, insert it into your site’s code, or use it in your CMS via the relevant integration module. This is the final step, after which Google Maps will work on your project.
Common mistakes when creating an API key
During setup, you may encounter different error messages. Here are some of the most common ones:
| Error | Reason | How to fix |
|---|---|---|
| InvalidKeyMapError | The key is invalid or deleted | Copy the valid key from Google Cloud Console |
| ApiNotActivatedMapError | The required API isn’t activated | Enable the needed service in the console |
| RefererNotAllowed | Domain or IP specified incorrectly | Check restrictions and add the correct data |
These errors can be fixed in just a few minutes. If the problem is different, we recommend checking the logs in Google Cloud Console.
Frequently asked questions when setting up and integrating Google Maps
When working with the Google Maps API, users often encounter the same questions. Below are the answers to the most common ones so you can quickly find a solution.
No, a billing account is mandatory. Google requires a card for verification, but no automatic charges are made.
Yes, you can. However, for security and convenience, it’s better to create a separate key for each project.
Disable it in Google Cloud Console and create a new one. This is the fastest and safest way to avoid costs.
There are no formal restrictions. You can create multiple keys and use them for different sites or environments (test or production).
No, they don’t expire. But it’s recommended to rotate them periodically for extra security.
Check if the free limit has been exceeded or if the required APIs are not activated in the console. In most cases, the issue lies there.

Checklist before launch
To ensure the integration works smoothly, check a few important points before launching the project into production:
- The created key is stored securely.
- All required APIs are activated.
- Restrictions are set for security (domain, IP, or app).
- A billing account is connected, and budget alerts are set.
- The map has been tested on a staging site or app.
If all these points are met, you can be confident the API will work stably and without unnecessary budget risks.
Getting and setting up an API key for Google Maps is easy if you follow the instructions. However, in practice, issues often arise due to minor details, such as access restrictions, configuration errors, or billing errors. That’s why we’ve compiled all the steps in this guide so you can connect maps without any hassle.